

In modern software development, API keys, database credentials, OAuth tokens, and private encryption keys are the digital keys to your company’s kingdom. Yet, even experienced engineering teams regularly fall victim to “secret sprawl”—the accidental hardcoding of sensitive credentials directly into source code files, configuration scripts, and local development test suites.
Once a secret is committed to a Git repository, it becomes part of the project’s permanent version history. Even if the commit is private, a compromised developer machine or an accidental push to a public repository can expose infrastructure to automated scraping bots within seconds.
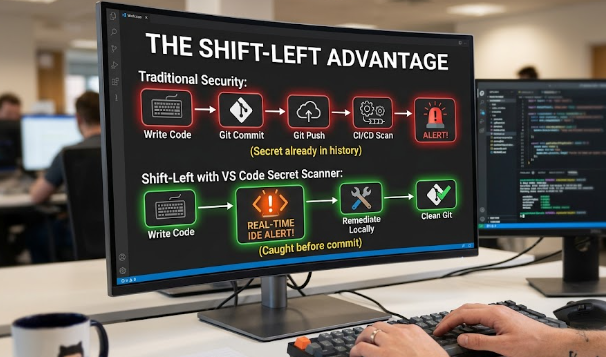
The most effective way to eliminate this risk is to adopt a shift-left security model: catching and remediating secrets right where code is written.
This comprehensive guide explains how a vscode secret scanner works, compares the top secret scanning extensions available in the Visual Studio Code Marketplace, walks through a complete installation and scanning workflow, and provides a 5-step incident response playbook if an exposed key is detected.
What Is a VS Code Secret Scanner and Why Is It Essential?
A VS Code secret scanner is an integrated development environment (IDE) extension or tool that analyzes your codebase in real time to identify exposed credentials—such as AWS access keys, Stripe tokens, OpenAI API keys, database connection strings, and SSH private keys—before they are committed to version control.
The Severe Risks of Hardcoded Credentials
Hardcoded credentials represent one of the most persistent attack vectors in application security:
- Formal Vulnerability Classification: The security industry formally categorizes hardcoded secrets under CWE-798: Use of Hard-coded Credentials and CWE-259: Use of Hard-coded Password.
- OWASP Top 10 Inclusion: The OWASP Top 10 lists hardcoded tokens and exposed credentials under A07:2021 – Identification and Authentication Failures and A05:2021 – Security Misconfiguration.
- Automated Exploitation: Malicious bots continuously monitor public code repositories. When cloud credentials (like AWS or Google Cloud service accounts) are committed, threat actors routinely discover and exploit them within minutes, spinning up unauthorized compute instances or exfiltrating production databases.
- Privacy & Regulatory Penalties: Leaked credentials frequently lead to unauthorized data exposure, triggering mandatory breach notifications and substantial fines under global privacy regulations such as GDPR and CCPA. Utilizing an automated privacy leak detector alongside secret scanners ensures organizations catch both credential exposures and sensitive personal data leaks across their development lifecycle.
The Rise of AI Coding Assistants and Accidental Leaks
With the rapid adoption of AI coding tools like GitHub Copilot, Cursor, and generative coding plugins in VS Code, secret exposure risks have evolved. AI models trained on public repositories may generate code snippets containing realistic-looking API key structures, mock authorization headers, or hardcoded authentication strings.
Developers who copy and paste or accept AI suggestions without strict inspection often inadvertently introduce hardcoded secrets into production branches. Implementing strict AI app security protocols and real-time IDE scanning provides an essential safety buffer when working with AI-generated code.
How VS Code Secret Scanners Work Under the Hood
Modern VS Code secret scanning extensions operate as background language services, listening to document lifecycle events (onDidChangeTextDocument as you type or onDidSaveTextDocument when saving). They evaluate code using three core detection mechanisms:

1. Signature-Based Pattern Matching (Regular Expressions)
The foundation of any secret scanner is a robust library of regular expressions tailored to match the unique structure and prefix conventions used by major cloud and SaaS providers:
- AWS Access Keys:
AKIA[0-9A-Z]{16} - GitHub Personal Access Tokens:
ghp_[a-zA-Z0-9]{36} - Stripe Secret Keys:
sk_live_[0-9a-zA-Z]{24} - Slack Bot Tokens:
xoxb-[0-9]{11}-[0-9]{11}-[a-zA-Z0-9]{24} - OpenAI API Keys:
sk-proj-[a-zA-Z0-9_-]{48,}
Advantage: Extremely high accuracy and near-zero false positives for branded, structured credentials.
2. Shannon Entropy Analysis (Measuring String Randomness)
Not all credentials follow a predictable prefix. Generic database passwords, custom HMAC keys, and internal API tokens often look like unstructured strings.
To catch these, scanners compute the Shannon entropy of strings in your code. Shannon entropy is a mathematical calculation measuring the degree of information density and randomness in a sequence of characters:
Entropy H(X)=−i=1∑nP(xi)log2P(xi)
- Low Entropy: Strings like
password123ordatabase_connection_urlhave repetitive, predictable character distributions. - High Entropy: Strings like
d9f8a7c6e5b4123984fedcba01294857exhibit high randomness, signaling cryptographic keys, hashes, or generated tokens.
Advantage: Catches proprietary, unbranded, and custom secrets that lack predefined regex signatures.
3. Active Credential Verification
Advanced scanners go one step further by sending non-destructive, authenticated API calls to provider endpoints (such as GitHub, AWS, or Slack) to verify whether a discovered string is an active, functioning credential or a deprecated test placeholder.
Understanding and Managing False Positives
Entropy-based scanning can occasionally flag non-sensitive random data, such as:
- Universally Unique Identifiers (UUIDs)
- SHA-256 commit hashes
- Minified JavaScript bundle variables
- Base64-encoded vector assets
Quality VS Code extensions allow developers to mark false positives via inline quick actions or whitelist them in dedicated configuration files (e.g., .secretsignore or .gitleaksignore).
Top VS Code Secret Scanning Extensions Compared
The Visual Studio Code Marketplace offers several extensions for secret detection. Here is how the leading options compare:
| Extension / Tool | Engine & Detection Method | Scan Triggers | Key Strengths | Best Suited For |
|---|---|---|---|---|
| GitGuardian | Proprietary regex (400+ types) + Entropy + Verification | Real-time (On type & on save) | Deep detection library, detailed remediation instructions, enterprise dashboard integration. | Professional developers & enterprise engineering teams. |
| Clutch Security | Built on Gitleaks open-source engine | Real-time (On save) | Fast, lightweight, leverages industry-standard Gitleaks regex rules. | Developers looking for standard Gitleaks rules inside the IDE. |
| Cycode | Multi-engine (Secrets, SAST, IaC misconfigurations) | On save & manual workspace scan | Broad security scanning (IaC, container files, source code vulnerabilities). | Teams wanting combined secret scanning and static code analysis. |
| Secr | Regex pattern matching (20+ core providers) | On open & on save | Minimalist, zero-config, runs completely locally with no account required. | Individual developers seeking quick, lightweight API key detection. |
| DevSecode Scanner | Integrates Gitleaks, Trivy, and Bandit | On-demand & workspace scan | Multi-tool security auditing inside the editor. | Security auditing and project-level reviews. |
Step-by-Step Guide: How to Install and Scan for Secrets in VS Code
Follow this practical walkthrough to configure a secret scanner in your VS Code workspace:
+-------------------------------------------------------------------------------+| VS CODE SECRET SCANNING WORKFLOW || || [Step 1] Install Extension --> [Step 2] Configure Workspace & Ignore Rules || | || [Step 4] Apply Quick Fixes <-- [Step 3] Scan & Inspect Problems Panel |+-------------------------------------------------------------------------------+
Step 1: Install Your Preferred Extension
- Open Visual Studio Code.
- Open the Extensions Marketplace sidebar by clicking the Extensions icon or pressing
Ctrl+Shift+X(Windows/Linux) orCmd+Shift+X(macOS). - Search for GitGuardian (or Clutch Security / Cycode).
- Click Install.
(If using GitGuardian, you will be prompted to authenticate with a free individual or team account to enable real-time detection and signature updates).
Step 2: Configure Workspace Rules and Ignore Patterns
To prevent scanners from auditing compiled output, dependencies, or test fixtures, configure an ignore file in your project root:
- Create a
.secretsignore(or tool-specific ignore file like.gitleaksignore) in the root of your project. - Add directories that contain build artifacts, minified libraries, or mock test fixtures:
text# Ignore build artifacts and third-party dependenciesnode_modules/dist/build/vendor/*.min.js*.lock# Ignore specific synthetic test fixtures (clearly mock data)tests/fixtures/mock_keys.json
Step 3: Run a Workspace Scan and Inspect the Problems Panel
Once installed, the scanner automatically inspects open files as you edit and save. To review all detected issues across your workspace:
- Open the VS Code Problems panel by pressing
Ctrl+Shift+M(Windows/Linux) orCmd+Shift+M(macOS), or navigating to View > Problems in the top menu. - Detected secrets will appear categorized by severity (typically Warning or Error), indicating the exact file name and line number.
- The editor will display squiggly yellow or red underlines directly beneath the hardcoded token.
Step 4: Use Inline Highlights and Quick Fix Actions
Hover your cursor over the highlighted secret in your code editor:
- A diagnostic tooltip will appear identifying the type of secret (e.g., “GitGuardian: AWS Access Key ID detected”).
- Click Quick Fix… (or press
Ctrl+./Cmd+.). - Select an automated action:
- Ignore / Mark as false positive: Suppresses future warnings for this specific string.
- View Remediation Guidance: Opens contextual instructions detailing how to safely rotate the key.
What to Do When a Secret Is Found (5-Step Remediation Protocol)
WARNING
Common Critical Mistake: Never simply delete a hardcoded secret in a new Git commit and assume it is safe. Git preserves complete snapshot histories; the secret remains accessible in previous commits, diff logs, and reflog caches.
Follow this 5-step incident remediation protocol whenever a real credential has been exposed:
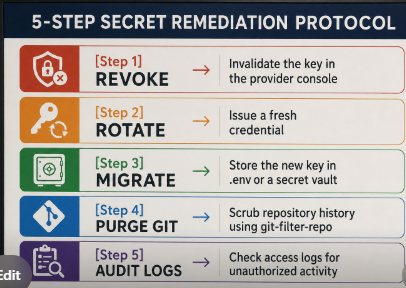
Step 1: Revoke the Compromised Credential Immediately
Treat any hardcoded credential that has left your local editor as compromised:
- Log into the respective service provider’s administrative console (e.g., AWS IAM, GitHub, Stripe, OpenAI).
- Immediately deactivate or revoke the exposed key so it can no longer authenticate requests.
Step 2: Rotate and Issue a Fresh Credential
- Generate a new API key or password.
- Assign the principle of least privilege—granting only the specific permissions needed for the application’s functionality.
Step 3: Migrate the Secret to Environment Variables or a Secret Vault
Never store raw keys in source code files. Instead:
- Place the new credential in a local
.envfile:envDATABASE_URL=”postgresql://user:password@localhost:5432/mydb”STRIPE_SECRET_KEY=”sk_test_…” - Verify that
.envis listed in your project’s.gitignorefile:gitignore# .gitignore.env.env.local.env.*.local - Load the variable dynamically in your code using standard runtime libraries (e.g.,
process.env.STRIPE_SECRET_KEYin Node.js,os.environ.get('STRIPE_SECRET_KEY')in Python). - For production environments, inject secrets using dedicated secret management services such as AWS Secrets Manager, HashiCorp Vault, Azure Key Vault, or Doppler.
Step 4: Purge the Secret from Git History
If the secret was previously committed to your local or remote Git history, the entire repository history must be scrubbed using modern tools like git-filter-repo or BFG Repo-Cleaner:
bash# Example: Using git-filter-repo to replace an exposed key across all commitsgit filter-repo --replace-text expressions.txt
(Where expressions.txt contains the literal leaked string replacement definition).
Step 5: Audit Access Logs
Review your cloud provider’s access and audit logs (e.g., AWS CloudTrail, GitHub Security Audit Log) for the timeframe between the initial commit and the revocation to verify whether unauthorized actors accessed your resources.
Building a Multi-Layered Secret Defense Pipeline
While an IDE extension provides immediate developer feedback, relying on a single tool is insufficient for organizational security. Developers may disable extensions, use different editors, or pull external branches.
A resilient architecture implements a 4-Layer Defense-in-Depth Pipeline:
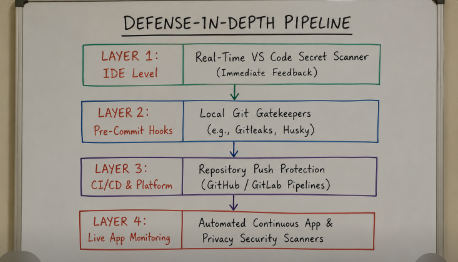
Layer 1: Real-Time IDE Scanning (VS Code)
- Role: Catches mistakes instantaneously as code is written.
- Benefit: Fixes cost zero friction because the code has not yet been staged or shared.
Layer 2: Pre-Commit & Pre-Push Git Hooks
- Role: A local gatekeeper that automatically scans staged changes whenever a developer runs
git commitorgit push. - Tools: Open-source tools like Gitleaks or TruffleHog integrated via
pre-commitor Husky:yaml# .pre-commit-config.yamlrepos: – repo: https://github.com/gitleaks/gitleaks rev: v8.18.2 hooks: – id: gitleaks
Layer 3: Repository Push Protection and CI/CD Gates
- Role: A centralized safety net hosted on platforms like GitHub Enterprise, GitLab, or Bitbucket.
- Mechanism: Blocks incoming Git pushes if secrets are detected in the commit payload, preventing leaked data from ever reaching remote branches.
Layer 4: Automated Continuous Monitoring
- Role: Scans deployed web applications, APIs, endpoints, and connected repositories on an ongoing schedule.
- Implementation: Combining internal repository scanning with an external automated app security scanner and continuous security monitoring ensures that live web apps, staging builds, and public assets remain protected from unforeseen credential and data leaks.
Regulatory and Compliance Standards for Secret Management
Enforcing automated secret scanning is not merely a development convenience—it is a mandatory requirement under leading international cybersecurity and compliance frameworks:
| Standard / Framework | Requirement / Control | Compliance Mandate |
|---|---|---|
| PCI DSS v4.0 | Requirement 6.4.3 & 8.6 | Explicitly prohibits the use of hard-coded authentication credentials (passwords, tokens, API keys) in source code, scripts, or client-side applications. |
| NIST SP 800-53 Rev. 5 | Control IA-5 (Authenticator Management) | Requires organizations to manage, protect, and control authenticators throughout their lifecycle, preventing cleartext exposure. |
| ISO/IEC 27001:2022 | Control A.8.28 (Secure Coding) | Mandates secure coding principles and automated security testing throughout development to prevent unauthorized credential disclosure. |
| SOC 2 (Trust Services Criteria) | CC6.1 & CC6.6 (Logical Access & Boundary Protection) | Requires logical access controls and proactive vulnerability management to safeguard infrastructure access keys. |
Pre-Flight Developer Checklist for Secret Hygiene in VS Code
Before committing and pushing code from your VS Code workspace, run through this quick security checklist:
- Active Scanner Enabled: A verified secret scanning extension (e.g., GitGuardian, Clutch Security) is installed and running in VS Code.
- Clean Problems Panel: The VS Code Problems panel (
Ctrl+Shift+M/Cmd+Shift+M) shows zero unresolved secret or credential warnings. -
.gitignoreEnforced: All local configuration files (.env,.env.local,service-account.json,id_rsa) are explicitly listed in.gitignore. - No Hardcoded Fallbacks: Default API keys or fallback passwords in configuration files have been replaced with empty environment variable lookups.
- Pre-Commit Hook Active: A local pre-commit hook (such as Gitleaks) is enabled in the repository root.
- Mock Test Data Sanitized: Unit tests and mock fixtures use synthetic, obvious dummy strings (e.g.,
EXAMPLE_KEY_12345) rather than expired production tokens.
Frequently Asked Questions (FAQ)
Does VS Code have built-in secret scanning?
VS Code does not have a native, built-in secret scanning engine for auditing source code by default. It provides a developer API called secretStorage (used by extensions to store their own tokens securely in the OS keychain), but scanning codebases for exposed API keys requires installing a dedicated extension from the VS Code Marketplace, such as GitGuardian, Clutch Security, or Cycode.
What is the difference between a VS Code secret scanner and GitHub Push Protection?
A VS Code secret scanner runs locally inside your editor, giving you real-time visual feedback as you write code. GitHub Push Protection is a server-side guardrail on GitHub that intercepts and rejects commits containing detected secrets when you run git push. IDE scanning is “Shift-Left” (fastest remediation), while Push Protection acts as a secondary, non-bypassable perimeter fence.
How do secret scanners handle false positives?
When a scanner flags a non-secret (such as a UUID, test hash, or base64 icon string), you can hover over the code and click Quick Fix to mark it as a false positive, add an inline ignore comment (e.g., # ggignore or // gitleaks:allow), or list the file/pattern in your .secretsignore configuration file.
Why is simply deleting a committed secret in a new commit not enough?
Git is an append-only version control system designed to preserve history. Deleting a secret in a subsequent commit only removes it from the current snapshot (HEAD). The secret remains completely visible in the repository’s commit log, branch diffs, and git history, where automated scrapers can easily extract it. To remediate a committed secret, you must revoke the key with the provider and purge it from your history using git-filter-repo.
Can secret scanners detect secrets in .env files?
Yes, most extensions scan .env files. However, .env files are intended to hold local development secrets—provided they are strictly excluded from version control via .gitignore. Quality extensions allow you to configure rules that permit secrets in local .env files while alerting you if .env is accidentally tracked by Git.

Leave a Reply